It's about open source softwares

Thursday, December 17, 2015

GUACAMOLE: Open Source Web Based Remote Desktop Gateway

Recently, I was searching for remote desktop software using which I can do the remote or ssh login through browser.

There are so many software like thinVNC, Thinfinity, TightVNC which helps us to do remote desktop. These software uses HTML5, VNC variants like thinVNC, thickVNC, UltraVNC. One problem with these software is that we need to install client on machine which we gonna do RDP or SSH.

While exploring I stumble upon Guacamole(Not Recipe). It is clientless remote desktop gateway. We don't need to install any client on machines. We requires only setup guacamole server on separate machine then you only need to access machines through web browser. 

Yeah, It is open Source.

Guacamole is HTML5 web application that provides access to desktop environments using remote desktop protocols. It supports VNC or RDP protocols. We can do SSH login also using Guacamole.

Architecture


Guacamole Architecture
Guacamole is collection of many things, 

- Guacamole Protocol
- guacd
- Web Application
- VNC Client
- Remote Desktop Gateways


Guacamole Protocol
Web browser or application doesn't understand any RDP or VNC or any other protocols which are supported by Guacamole stack. It communicates with guacamole through Guacamole Protocol. It renders remote display and transfer events.

Guacd
It is the heart of guacamole stack. It acts as mediator between the remote desktop machine and web application. It also communicate with the help of Guacamole protocol.

Web Application
We are interacting with guacamole using web application. It doesn't implement any remote desktop protocol but it relies on guacd. It provides UI (user interface) and authentication functionality to users.

VNC Client
It is nothing but java-script client(java server component) which is used to translates VNC into XML format.

Remote Desktop Gateways
Guacamole not only supports VNC but it also support other protocol like RDP, SSH, Telnet, etc. Guacamole stack supports multiple remote desktop protocols through different gateways.

Best part of Guacamole stack is that we doesn't requires to set RDP or web client on each and every machines as other software does.

References:

  • http://guac-dev.org
  • http://guac-dev.org/doc/gug
Share:

Tuesday, December 8, 2015

Start-Stop virtual machines parallelly present in cloud service (Azure IAAS)

Time and cost are the two crucial factors in cloud environment, people are paying for what they are using. I have setup my environment in Azure using Infrastructure-as-a-service (IAAS). Environment consists of 20+ virtual machines, virtual networks. I have wrote powershell scripts which provision environment for me.

While working on cloud environment with high configuration machines, I need to make optimal use of cloud environment to reduce my cloud cost. 

For this we can think of  following approaches
  • Schedule start/stop of cloud service to reduce cost
  • Parallel operation within cloud service to reduce start/stop time

Initially, I have used Start-AzureService and Stop-AzureService powershell cmdlet for starting and stopping of cloud services and it does job for me.

Observations: 

Whenever, I stop cloud service using Stop-AzureService command it stops service successfully. But it is not deallocating the cloud resources. Technically cloud service is in stopped state but its IP address, VHDs, etc. are still in use.  Azure charge for these cloud services. 

As an alternative, I came across Start-AzureVM and Stop-AzureVM powershell cmdlet which start stops the virtual machine present in cloud service. Stop-AzureVM stops specific virtual machine present in the cloud service and also deallocates its resources.

In my environment i have 20+ virtual machines so starting or stopping these machines takes around 60 minutes (each machine takes around 3 minutes to start/stop). So i need to think of parallel execution to reduce start and stop time. I tried to start or stop the virtual machine in parallel in powershell but was not able to do so. I faced mutual exclusion error while performing operation on different virtual machines within a same cloud service. 

In classic model of virtual machine Azure has some restriction while performing the  parallel operation on cloud resources specifically cloud service, virtual networks, etc. We can perform operation on only one virtual machine within cloud service.

We can also manage Azure cloud through management portal. Whenever we start the cloud service using management portal then Azure starts all virtual machines in parallel within 3-4 minutes. While stopping the cloud service using management portal it stops the service and also deallocates its resources. (Isn't it great?)

While exploring the internal working of management portal i came across that we can also manage Azure through Azure Service Management APIs. I wrote the powershell scripts which manages my cloud service. Using REST API, I am able to start/stop 20+ virtual machines in parallel within 3-4 minutes.

Find the powershell script below which start/stop cloud service with the help of Azure service management APIs. 

manageCloudService.ps1

<# 
.SYNOPSIS 
   Manage cloud service using REST API 
.DESCRIPTION 
   Start and stop VMs present in cloud service in parallel 
.EXAMPLE 
   .\manageCloudService.ps1 -ServiceName "testme-cs" -OperationType "start/stop"  
#>

param(
[string]$serviceName,
[string]$operationType)

$deploymentName = $serviceName

# Select an Azure Subscription for which to report usage data
$subscriptionId = (Get-AzureSubscription -Current).SubscriptionId
# Set Azure AD Tenant for selected Azure Subscription
$adTenant = (Get-AzureSubscription -SubscriptionId $subscriptionId).TenantId

# Set parameter values for Azure AD auth to REST API

# Well-known client ID for Azure PowerShell
$clientId = "1950a258-227b-4e31-a9cf-717495945fc2" 
# Redirect URI for Azure PowerShell
$redirectUri = "urn:ietf:wg:oauth:2.0:oob" 
# Resource URI for REST API
$resourceAppIdURI = "https://management.core.windows.net/" 
# Azure AD Tenant Authority
$authority = "https://login.windows.net/$adTenant"

# Credential object
$userName = "organisation user"
$password = "secretepassword"
$creds = New-Object "Microsoft.IdentityModel.Clients.ActiveDirectory.UserCredential" -ArgumentList $userName,$password

# Create AuthenticationContext tied to Azure AD Tenant
$authContext = New-Object "Microsoft.IdentityModel.Clients.ActiveDirectory.AuthenticationContext" -ArgumentList $authority
# Acquire token
$authResult = $authContext.AcquireToken($resourceAppIdURI,$clientId,$creds)
# Create Authorization Header
$authHeader = $authResult.CreateAuthorizationHeader()

# Set REST API parameters
$contentType = "text/xml;charset=utf-8"

# Set HTTP request headers to include Authorization header
$requestHeader = @{"Authorization" = $authHeader; "x-ms-version" = "2014-05-01"}

$uri = "https://management.core.windows.net/$subscriptionId/services/hostedservices/$serviceName/deployments/$deploymentName/roles/Operations"

# Get virtual machine Name present in cloud service
$roles = ""
$vmList = Get-AzureVM -ServiceName $serviceName |
%{
    $roles = $roles + "" + $_.Name+ ""
    $vmNameForMonitor = $_.Name  
}  

if ($operationType.ToLower() -eq "start")
{
    $body = @"

  StartRolesOperation
  
  $roles
  

"@
 # Invoke REST API
    Invoke-RestMethod -Uri $uri -Method Post -Headers $requestHeader -Body $body -ContentType $contentType
    # wait for vm to start
    $vm = Get-AzureVM –ServiceName $ServiceName -Name $vmNameForMonitor 
    $vmStatus = $vm.PowerState 
    if (!($vm.PowerState -eq "Started")) {   
        do {   
            Start-Sleep -s 5    
            $vm = Get-AzureVM –ServiceName $ServiceName -Name $VMName 
            $vmStatus = $vm.PowerState   
        }until($vmStatus -eq "Started")   
    }
}
elseif ($operationType.ToLower() -eq "stop")
{
$body = @"

  ShutdownRolesOperation
  
  $roles
  
  StoppedDeallocated

"@
 # Invoke REST API
    Invoke-RestMethod -Uri $uri -Method Post -Headers $requestHeader -Body $body -ContentType $contentType
}


References:


Hope this script will help you guys to reduce your cloud bill. Suggestion and feedback are welcome.

Share:

Friday, October 23, 2015

Want to Ping Azure VM?

Whenever there is issues with any application or machines, the first thing we do is PING. I mean ping to that machine using IP address or hostname (if name resolution setup in the environment).

In Azure cloud we are not able to ping the virtual machines using IP address from outside environment. Ping uses ICMP protocol to communicate with each other. In Azure ICMP protocol is turned off. Azure firewall doesn't allow any ICMP traffic to go in and out of their infrastructure.

Though you can ping Azure virtual machines which are present in virtual network. For this you need to allow inbound rule for ICMP traffic in firewall. You can also disable the firewall. After this you are able to ping the machines present in virtual network using IP addresses.

Note: You can ping the internal or external IP of virtual machine only from inside not from outside the only.
Share:

Tuesday, October 6, 2015

Install NGINX as windows service using nssm

nginx [engine x] is popular HTTP and reverse proxy server with lot of features. nginx provides executable files for windows environment. We just need to download and unzip setup file to get started.  The official document says we cannot run nginx as windows service. 

We can use nssm (non sucking service manager) to install nginx as windows service. nssm monitors the running service and will restart it if it dies.

Install nginx  

Download Nginx stable version(nginx-1.8.0) from http://nginx.org/en/download.html
Unzip setup and copy in C:\nginx-1.8.0 directory. 


Install nssm

Download nssm zip file from http://nssm.cc/download 
unzip it in C:\nssm-2.24 directory.


Install nginx as windows service


Run below command to install nginx service

C:\> cd C:\nssm-2.24\win64
C:\> nssm.exe install nginx


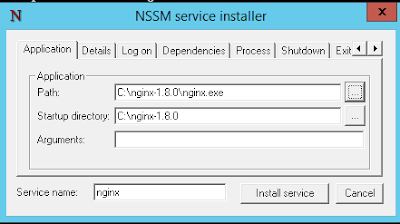
It will pop up GUI screen in which we have to provide nginx information. Set the application path to nginx executable present in “C:\nginx-1.8.0”. Explore other options present for recovery, login, dependencies, etc. 


Press install service button to install service


Confirm the service installation in services 
o Click ctl+R  to open RUN prompt
o Type services.msc 

Start nginx service and confirm the installation


You are ready to use nginx server. 


References:


  • http://nginx.org/
  • http://nssm.cc/


Share:

Saturday, October 3, 2015

SERF: In a Nutshell

What is SERF


SERF is open source decentralized, fault-tolerant and highly available solution by Hashicorp used for cluster membership management, failure detection and orchestration.

Serf relies on an efficient and lightweight gossip protocol to communicate with nodes. The Serf agents periodically exchange messages with each other in much the same way that a zombie apocalypse would occur: it starts with one zombie but soon infects everyone. It communicates using both TCP and UDP protocols. It is extremely lightweight and uses low memory footprint(5 to 10 MB). Serf runs on every major platform: Linux, Mac OS X, and Windows.

Serf tries to solves problems related to clustered architectures,
  • Cluster Membership Management: Serf maintains list of members present in the cluster. It also provides provision to execute custom handler scripts whenever membership changes. Serf agents exchange messages to each other periodically to check the membership status i.e. joining or leaving of members.
  • Failure Detection and Recovery: Serf automatically detects failed nodes within seconds, notifies the rest of the cluster, and executes handler scripts allowing you to handle these events. Serf will attempt to recover failed nodes by reconnecting to them periodically.
  • Event Propagation: Serf can broadcast custom events and queries to the cluster. These can be used to trigger deploys, propagate configuration, etc. Events are simply fire-and-forget broadcast, and Serf makes a best effort to deliver messages in the face of offline nodes or network partitions. Queries provide a simple real-time request/response mechanism.

Use Cases


SERF is decentralize solution for cluster management so it solves use-cases that are having decentralized state, masterless architecture, and are completely fault tolerant.
  • Webservers and load balancers
  • Memcached and Redis clusters
  • Triggering deployments
  • Updating DNS records
  • Simple Observability
  • A Building Block for Service Discovery

References

  • https://www.serfdom.io
  • https://www.serfdom.io/docs/index.html

Share:

Wednesday, August 5, 2015

Merge GIT Branches Using JENKINS

Continuous Integration and deployment or delivery (CI/CD) pipeline consists of many machines or environments. It has development, production, integration, testing and staging machines. Each machine has separate branch in GIT to store the source code.

In GIT, Development branch has all code from developers which are in development phase. After completing development, a developer pushes his/her code to integration branch. It results into running build scripts, testing scripts to check the integrity of code. Likewise code pushed from integration branch to staging and later production branch.

At each stage of CI/CD pipeline, one has to push code from one branch to another or merge them. As DevOps guy one should not do it manually. Jenkins provides the facility to merge two git branches and push it to remote branch as part of build tasks.

Merging git branch using Jenkins task consists of following steps,

  • Install GIT plugin in Jenkins
  • Create Jenkins task for branch merging
  • Configure Jenkins task


Install GIT plugin

Installing plugins to Jenkins is easy. For installing GIT plugin in your Jenkins instance, refer to the link below.

Create Jenkins task


Create new Jenkins task which will merge the two GIT branches.


Configure Jenkins task


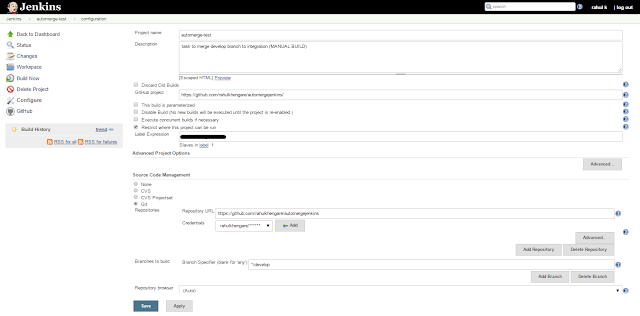
I have created an automergejenkins Github project. It has four branches master, develop, integration and production.

At this post, I am demonstrating how to configure Jenkins task to merge develop branch to integration.   
  • Source code configuration
In source code management section, specify the GIT repository and branch to build. I am building develop branch and merging it to integration branch.

Press Add button to add "Additional Behaviours". It shows different build options. 
Select "Merge before build" option and specify branch to which develop branch is going to merge.
   

If you need to specify any build command after merging of branches you can do it in Build section.
  • Post Build Action
After configuring the build option, we have to publish merge result to remote branch. 
In "Post-build Action" section add Git Publisher option which will push the merge results only if build succeed.


When you build this task, develop branch got merge into integration branch. You can build the task manually or configure it to build on the other build task results.


References,

  • http://blog.cloudbees.com/2012/03/using-git-with-jenkins.html
  • http://www.vogella.com/tutorials/Jenkins/article.html
  • https://wiki.jenkins-ci.org/display/JENKINS/Git+Plugin

Share:

Wednesday, July 22, 2015

Cutting Down The Cost Of Azure VMs

In cloud infrastructure, We have lot of machines present other than production servers. This includes machines used for development and testing purposes. Some of them also used for temporary purposes like doing demos to client, doing R&D on cloud infrastructure, etc. There are some machines present which are used for implementing continuous integration and deployment pipelines(Jenkins or Travis server). 

These machines does not requires high end configurations, auto-scaling or load balancing features. Also we can compromise its CPU and disk performance as long as it doesn't affects functionalities.

Major part of cloud bill consists of VM cost. Though Azure charge you for their service on minute by minute basis. To save more money, Azure provides a basic service tier for general purpose VMs(A0-A4). They are similar to standard service tier with having some differences.

Difference between Basic and Standard service tiers VM


Features
Standard Tier VM
Basic Tier VM
Available for
All sizes of VM
Only for A0-A4 instances
Auto scaling
Present
Absent
Load Balancing
Present
Absent
Disk IOPS
Almost double than basic tier
Half than standard tier
CPU Performance
Better CPU performance
Less CPU performance than standard tier
Cost
-
20-25% cheaper than standard tier

As I said earlier, There are machines present in cloud infrastructure which do not requires auto-scaling and load-balancing features for their use. These can also works with low disk IOPS and CPU performance. For these kind of machines choosing basic service tier for Azure VMs saves money, which you can spend it for doing R&D of another Azure services.

There are several ways to create create machines with basic service tier. You can use Azure portal or powershell. If you are using powershell New-AzureQuickVM cmdlet then just prefix "Basic_" to virtual machine instance size (e.g. to create A1 machine use "Basic_A1" for InstanceSize parameter).


Illustration: 

A1 Standard (1 core, 1.75 GB) Linux machine     
Per day Cost  = 24 hrs. * Rate
         = 24 * 0.06
                                 = 1.44 $
Monthly Cost = 1.44 * 30
                                 = 43.2 $

A1 Basic (1 core, 1.75 GB) Linux Machine
Per day Cost = 24 hrs. * Rate
        = 24 * 0.044
                                = 1.056 $
Monthly Cost = 1.056 * 30
                                 = 31.68 $


Changing instance type from standard to basic saves up to 25% of VM bill.

There are many ways to reduce the cloud cost like,
  • Identifying the unused VMs and shut them down. 
  • Add scheduler to start/stop non production VMs during office hours.
  • Choose instance type of VM carefully. 

Do give importance to such small things in cloud, because every PENNY counts right??
Share:

Thursday, July 2, 2015

Backup and Restore JENKINS Jobs


In an organization Jenkins plays important role achieving continuous integration and deployment/delivery a.k.a CI/CD pipeline. There are other tools present for achieving CI/CD like Travis, Jetbrains, Bamboo, etc. I am using Jenkins because it is popular in open source community.

While automating the tasks we are making changes in Jenkins jobs. Over the period of time Jenkins server is filled with lot of jobs. In case failure of Jenkins server, migrating Jenkins server to another machine or accidentally deletion jobs cause lot of trouble for DevOps. It is necessary to have backup of Jenkins jobs, so that we can restore them in short period of time. There are several plugins present for Jenkins like backup-plugin, configuration-history-plugin which does job for you. For this you have to do additional configurations. 

Jenkins provides REST API for managing jobs easily. Jenkins stores the job configuration in config.xml file that is present in the root directory of job. If you are OK with creating/migrating jobs without build number, build history, etc. then we can create/migrate jobs very easily with the help of jenkins's job REST API.

Backup Jenkins Job


Taking backup of Jenkins job is quite easy, you just have to login to your Jenkins server through browser. After login append "/job/job-name/config.xml" to URL. It will show job configuration. Just save the config.xml file contents.  

Here, I am backing up automerge-test job.


Jenkins Job Backup
 If you are familiar with CURL then using GET method you can get config.xml file.

Restore Jenkins Job


Restoring of jenkins jobs are as simple as taking backup. 
  • Create an empty job in Jenkins
  • POST the config.xml to Jenkins server using POSTMAN 

First you have to create an empty Jenkins job on the same server or new server in case of migrating jobs in to another server.

Create empty jenkins job

Newly created automerge-test job doesn't have anything right now.

Empty Configuration

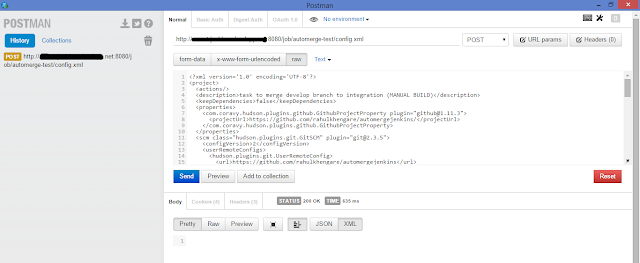
Now install POSTMAN extension to your browser. Using POST method provide a job configuration to jenkins server. Use http://<jenkins_server_name>/job/<job_name>/config.xml in URL and paste config.xml content in body section with raw-text formatting.

Press Send button to post the config.xml contents to Jenkins server.

Restore Job using POSTMAN


 Using POST API configurations filled in newly created job. Confirm Job configuration in Jenkins.

Job Configuration

Jenkins jobs are backup and restore successfully using REST API.

Share:

Monday, June 1, 2015

PASH - An Open Source Implementation of Windows PowerShell


Pash is an open source implementation of Powershell which can be used on linux, mac or windows mobiles.

The main goal of implementing the Pash is to provide a rich shell environment for other operating systems as well as to provide a hostable scripting engine for rich applications. The script should run across the machine and different OS seamlessly is a secondary goal.(Source:http://pash.sourceforge.net)

In this blog post I am going to provide installation of Pash on ubuntu machine.

Install MONO


First we have to install mono platform designed to allow developers to create cross platform applications.
rahul@ubuntu:~$ sudo apt-key adv --keyserver hkp://keyserver.ubuntu.com:80 --recv-keys 3FA7E0328081BFF6A14DA29AA6A19B38D3D831EF

rahul@ubuntu:~$ echo "deb http://download.mono-project.com/repo/debian wheezy-apache24-compat main" | sudo tee -a /etc/apt/sources.list.d/mono-xamarin.list

rahul@ubuntu:~$ sudo apt-get update 

rahul@ubuntu:~$ sudo apt-get install mono-devel
rahul@ubuntu:~$ sudo apt-get install mono-complete

Clone git repository


Clone a Pash git repository on local machine using below command.
rahul@ubuntu:~$ cd /var/local
rahul@ubuntu:/var/local$ git clone https://github.com/Pash-Project/Pash.git

Build Pash source code


Build a pash source code using xbuild command
rahul@ubuntu:/var/local$ cd pash   
rahul@ubuntu:/var/local/Pash$ sudo xbuild 

Execute Pash


For opening Pash console execute Pash.exe file using mono command
rahul@ubuntu:/var/local/Pash$ mono Source/PashConsole/bin/Debug/Pash.exe
Pash Console

References:

Share:

Wednesday, May 27, 2015

Docker on Windows

      Day by day, Docker becoming very famous as it changes the process of building, deployment, shipping of applications with the help of operating system level virtualization technology called containers

Docker, What it is? 


      Docker is an open source projects that automates the deployment of applications inside containers. It uses operating system virtualization technology. It uses linux kernel features like resource isolation CGROUPS and kernel namespaces.

      Docker container is a virtual environment running on host operating system similar to virtual machines. The main difference between traditional virtual machine and container is that they all shares host machine kernel instead of having separate one for each container. Because container doesn't have their own kernel its very lightweight virtual machines.

This post describe the installation process of docker on windows using Boot2Docker.
   

Boot2Docker


Docker uses Linux kernel specific features. So that we required lightweight virtual machine to run docker on windows. Boot2Docker is nothing but lightweight linux distribution which is used for docker container on windows.
It runs in approx. 27MB RAM and boot in approx. 5 Sec.
Boot2Docker internals
Here, we are going to use docker on windows operating system, but internally it running docker engine on linux virtual machine(Boot2Docker). On Docker server we build, run, stop or download containers. We are only accessing or communicating with docker server using windows docker clients.

Installation


1. Download latest installer of boot2docker for windows from https://github.com/boot2docker/windows-installer/releases/latest

2. Click and run installer

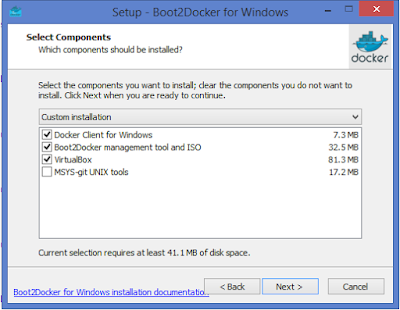
3. Installer installs windows docker client, Boot2Docker management tools and ISO, virtualBox, MSYS-git Unix tools.
    If virtual box and MSYS-git unix tools were already installed on your machine then installer doesn't install it.  

4. Select check box for desktop icon creation and adding docker executable to environment variables (PATH) 


5. Complete the installation by clicking finish button


6. Start boot2docker by clicking desktop shortcut or using program files -> Boot2Docker for windows.
    This will starts the docker engine and set the environment variables. 
    You can check the docker version by running "docker version" command. 


You can also see Boot2docker VM running in VirtualBox. 


Run "hello-world" docker container


Boot2Docker installer provides us "hello-world" image which only prints the hello message when we run container to verify the installation. You can run your first container simply typing "docker run" command
$ docker run hello-world


You have successfully installed the boot2docker on windows and ready to use docker. 

Using docker from powershell or windows cmd


For using docker from powershell or CMD, we have to add the .ssh in its PATH variables and set some docker variables like DOCKER_HOST, DOCKER_CERT_PATH and DOCKER_TLS_VERIFY


Useful Resource 

NOTE:
Recently, Microsoft announces new container technology as well as nano servers for azure cloud and windows servers to run cloud applications and containers.


Share: