It's about open source softwares

Wednesday, July 22, 2015

Cutting Down The Cost Of Azure VMs

In cloud infrastructure, We have lot of machines present other than production servers. This includes machines used for development and testing purposes. Some of them also used for temporary purposes like doing demos to client, doing R&D on cloud infrastructure, etc. There are some machines present which are used for implementing continuous integration and deployment pipelines(Jenkins or Travis server). 

These machines does not requires high end configurations, auto-scaling or load balancing features. Also we can compromise its CPU and disk performance as long as it doesn't affects functionalities.

Major part of cloud bill consists of VM cost. Though Azure charge you for their service on minute by minute basis. To save more money, Azure provides a basic service tier for general purpose VMs(A0-A4). They are similar to standard service tier with having some differences.

Difference between Basic and Standard service tiers VM


Features
Standard Tier VM
Basic Tier VM
Available for
All sizes of VM
Only for A0-A4 instances
Auto scaling
Present
Absent
Load Balancing
Present
Absent
Disk IOPS
Almost double than basic tier
Half than standard tier
CPU Performance
Better CPU performance
Less CPU performance than standard tier
Cost
-
20-25% cheaper than standard tier

As I said earlier, There are machines present in cloud infrastructure which do not requires auto-scaling and load-balancing features for their use. These can also works with low disk IOPS and CPU performance. For these kind of machines choosing basic service tier for Azure VMs saves money, which you can spend it for doing R&D of another Azure services.

There are several ways to create create machines with basic service tier. You can use Azure portal or powershell. If you are using powershell New-AzureQuickVM cmdlet then just prefix "Basic_" to virtual machine instance size (e.g. to create A1 machine use "Basic_A1" for InstanceSize parameter).


Illustration: 

A1 Standard (1 core, 1.75 GB) Linux machine     
Per day Cost  = 24 hrs. * Rate
         = 24 * 0.06
                                 = 1.44 $
Monthly Cost = 1.44 * 30
                                 = 43.2 $

A1 Basic (1 core, 1.75 GB) Linux Machine
Per day Cost = 24 hrs. * Rate
        = 24 * 0.044
                                = 1.056 $
Monthly Cost = 1.056 * 30
                                 = 31.68 $


Changing instance type from standard to basic saves up to 25% of VM bill.

There are many ways to reduce the cloud cost like,
  • Identifying the unused VMs and shut them down. 
  • Add scheduler to start/stop non production VMs during office hours.
  • Choose instance type of VM carefully. 

Do give importance to such small things in cloud, because every PENNY counts right??
Share:

Thursday, July 2, 2015

Backup and Restore JENKINS Jobs


In an organization Jenkins plays important role achieving continuous integration and deployment/delivery a.k.a CI/CD pipeline. There are other tools present for achieving CI/CD like Travis, Jetbrains, Bamboo, etc. I am using Jenkins because it is popular in open source community.

While automating the tasks we are making changes in Jenkins jobs. Over the period of time Jenkins server is filled with lot of jobs. In case failure of Jenkins server, migrating Jenkins server to another machine or accidentally deletion jobs cause lot of trouble for DevOps. It is necessary to have backup of Jenkins jobs, so that we can restore them in short period of time. There are several plugins present for Jenkins like backup-plugin, configuration-history-plugin which does job for you. For this you have to do additional configurations. 

Jenkins provides REST API for managing jobs easily. Jenkins stores the job configuration in config.xml file that is present in the root directory of job. If you are OK with creating/migrating jobs without build number, build history, etc. then we can create/migrate jobs very easily with the help of jenkins's job REST API.

Backup Jenkins Job


Taking backup of Jenkins job is quite easy, you just have to login to your Jenkins server through browser. After login append "/job/job-name/config.xml" to URL. It will show job configuration. Just save the config.xml file contents.  

Here, I am backing up automerge-test job.


Jenkins Job Backup
 If you are familiar with CURL then using GET method you can get config.xml file.

Restore Jenkins Job


Restoring of jenkins jobs are as simple as taking backup. 
  • Create an empty job in Jenkins
  • POST the config.xml to Jenkins server using POSTMAN 

First you have to create an empty Jenkins job on the same server or new server in case of migrating jobs in to another server.

Create empty jenkins job

Newly created automerge-test job doesn't have anything right now.

Empty Configuration

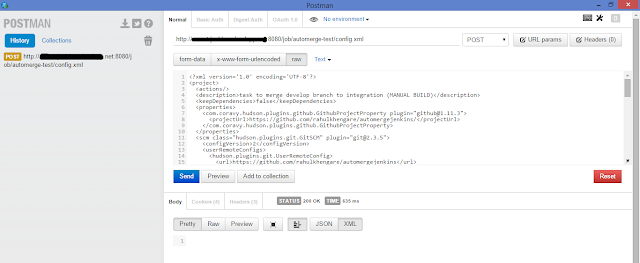
Now install POSTMAN extension to your browser. Using POST method provide a job configuration to jenkins server. Use http://<jenkins_server_name>/job/<job_name>/config.xml in URL and paste config.xml content in body section with raw-text formatting.

Press Send button to post the config.xml contents to Jenkins server.

Restore Job using POSTMAN


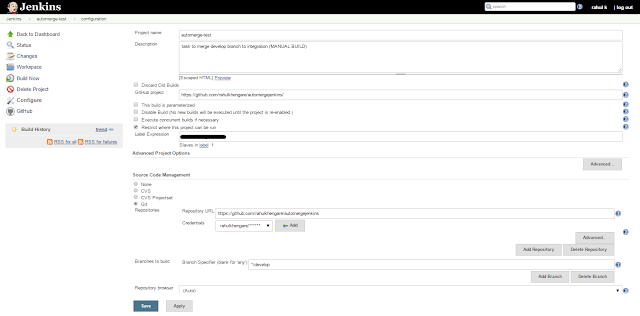
 Using POST API configurations filled in newly created job. Confirm Job configuration in Jenkins.

Job Configuration

Jenkins jobs are backup and restore successfully using REST API.

Share: