It's about open source softwares

Showing posts with label Azure. Show all posts

Tuesday, December 8, 2015

Start-Stop virtual machines parallelly present in cloud service (Azure IAAS)

Time and cost are the two crucial factors in cloud environment, people are paying for what they are using. I have setup my environment in Azure using Infrastructure-as-a-service (IAAS). Environment consists of 20+ virtual machines, virtual networks. I have wrote powershell scripts which provision environment for me.

While working on cloud environment with high configuration machines, I need to make optimal use of cloud environment to reduce my cloud cost. 

For this we can think of  following approaches
  • Schedule start/stop of cloud service to reduce cost
  • Parallel operation within cloud service to reduce start/stop time

Initially, I have used Start-AzureService and Stop-AzureService powershell cmdlet for starting and stopping of cloud services and it does job for me.

Observations: 

Whenever, I stop cloud service using Stop-AzureService command it stops service successfully. But it is not deallocating the cloud resources. Technically cloud service is in stopped state but its IP address, VHDs, etc. are still in use.  Azure charge for these cloud services. 

As an alternative, I came across Start-AzureVM and Stop-AzureVM powershell cmdlet which start stops the virtual machine present in cloud service. Stop-AzureVM stops specific virtual machine present in the cloud service and also deallocates its resources.

In my environment i have 20+ virtual machines so starting or stopping these machines takes around 60 minutes (each machine takes around 3 minutes to start/stop). So i need to think of parallel execution to reduce start and stop time. I tried to start or stop the virtual machine in parallel in powershell but was not able to do so. I faced mutual exclusion error while performing operation on different virtual machines within a same cloud service. 

In classic model of virtual machine Azure has some restriction while performing the  parallel operation on cloud resources specifically cloud service, virtual networks, etc. We can perform operation on only one virtual machine within cloud service.

We can also manage Azure cloud through management portal. Whenever we start the cloud service using management portal then Azure starts all virtual machines in parallel within 3-4 minutes. While stopping the cloud service using management portal it stops the service and also deallocates its resources. (Isn't it great?)

While exploring the internal working of management portal i came across that we can also manage Azure through Azure Service Management APIs. I wrote the powershell scripts which manages my cloud service. Using REST API, I am able to start/stop 20+ virtual machines in parallel within 3-4 minutes.

Find the powershell script below which start/stop cloud service with the help of Azure service management APIs. 

manageCloudService.ps1

<# 
.SYNOPSIS 
   Manage cloud service using REST API 
.DESCRIPTION 
   Start and stop VMs present in cloud service in parallel 
.EXAMPLE 
   .\manageCloudService.ps1 -ServiceName "testme-cs" -OperationType "start/stop"  
#>

param(
[string]$serviceName,
[string]$operationType)

$deploymentName = $serviceName

# Select an Azure Subscription for which to report usage data
$subscriptionId = (Get-AzureSubscription -Current).SubscriptionId
# Set Azure AD Tenant for selected Azure Subscription
$adTenant = (Get-AzureSubscription -SubscriptionId $subscriptionId).TenantId

# Set parameter values for Azure AD auth to REST API

# Well-known client ID for Azure PowerShell
$clientId = "1950a258-227b-4e31-a9cf-717495945fc2" 
# Redirect URI for Azure PowerShell
$redirectUri = "urn:ietf:wg:oauth:2.0:oob" 
# Resource URI for REST API
$resourceAppIdURI = "https://management.core.windows.net/" 
# Azure AD Tenant Authority
$authority = "https://login.windows.net/$adTenant"

# Credential object
$userName = "organisation user"
$password = "secretepassword"
$creds = New-Object "Microsoft.IdentityModel.Clients.ActiveDirectory.UserCredential" -ArgumentList $userName,$password

# Create AuthenticationContext tied to Azure AD Tenant
$authContext = New-Object "Microsoft.IdentityModel.Clients.ActiveDirectory.AuthenticationContext" -ArgumentList $authority
# Acquire token
$authResult = $authContext.AcquireToken($resourceAppIdURI,$clientId,$creds)
# Create Authorization Header
$authHeader = $authResult.CreateAuthorizationHeader()

# Set REST API parameters
$contentType = "text/xml;charset=utf-8"

# Set HTTP request headers to include Authorization header
$requestHeader = @{"Authorization" = $authHeader; "x-ms-version" = "2014-05-01"}

$uri = "https://management.core.windows.net/$subscriptionId/services/hostedservices/$serviceName/deployments/$deploymentName/roles/Operations"

# Get virtual machine Name present in cloud service
$roles = ""
$vmList = Get-AzureVM -ServiceName $serviceName |
%{
    $roles = $roles + "" + $_.Name+ ""
    $vmNameForMonitor = $_.Name  
}  

if ($operationType.ToLower() -eq "start")
{
    $body = @"

  StartRolesOperation
  
  $roles
  

"@
 # Invoke REST API
    Invoke-RestMethod -Uri $uri -Method Post -Headers $requestHeader -Body $body -ContentType $contentType
    # wait for vm to start
    $vm = Get-AzureVM –ServiceName $ServiceName -Name $vmNameForMonitor 
    $vmStatus = $vm.PowerState 
    if (!($vm.PowerState -eq "Started")) {   
        do {   
            Start-Sleep -s 5    
            $vm = Get-AzureVM –ServiceName $ServiceName -Name $VMName 
            $vmStatus = $vm.PowerState   
        }until($vmStatus -eq "Started")   
    }
}
elseif ($operationType.ToLower() -eq "stop")
{
$body = @"

  ShutdownRolesOperation
  
  $roles
  
  StoppedDeallocated

"@
 # Invoke REST API
    Invoke-RestMethod -Uri $uri -Method Post -Headers $requestHeader -Body $body -ContentType $contentType
}


References:


Hope this script will help you guys to reduce your cloud bill. Suggestion and feedback are welcome.
Share:

Friday, October 23, 2015

Want to Ping Azure VM?

Whenever there is issues with any application or machines, the first thing we do is PING. I mean ping to that machine using IP address or hostname (if name resolution setup in the environment).

In Azure cloud we are not able to ping the virtual machines using IP address from outside environment. Ping uses ICMP protocol to communicate with each other. In Azure ICMP protocol is turned off. Azure firewall doesn't allow any ICMP traffic to go in and out of their infrastructure.

Though you can ping Azure virtual machines which are present in virtual network. For this you need to allow inbound rule for ICMP traffic in firewall. You can also disable the firewall. After this you are able to ping the machines present in virtual network using IP addresses.

Note: You can ping the internal or external IP of virtual machine only from inside not from outside the only.
Share:

Wednesday, July 22, 2015

Cutting Down The Cost Of Azure VMs

In cloud infrastructure, We have lot of machines present other than production servers. This includes machines used for development and testing purposes. Some of them also used for temporary purposes like doing demos to client, doing R&D on cloud infrastructure, etc. There are some machines present which are used for implementing continuous integration and deployment pipelines(Jenkins or Travis server). 

These machines does not requires high end configurations, auto-scaling or load balancing features. Also we can compromise its CPU and disk performance as long as it doesn't affects functionalities.

Major part of cloud bill consists of VM cost. Though Azure charge you for their service on minute by minute basis. To save more money, Azure provides a basic service tier for general purpose VMs(A0-A4). They are similar to standard service tier with having some differences.

Difference between Basic and Standard service tiers VM


Features
Standard Tier VM
Basic Tier VM
Available for
All sizes of VM
Only for A0-A4 instances
Auto scaling
Present
Absent
Load Balancing
Present
Absent
Disk IOPS
Almost double than basic tier
Half than standard tier
CPU Performance
Better CPU performance
Less CPU performance than standard tier
Cost
-
20-25% cheaper than standard tier

As I said earlier, There are machines present in cloud infrastructure which do not requires auto-scaling and load-balancing features for their use. These can also works with low disk IOPS and CPU performance. For these kind of machines choosing basic service tier for Azure VMs saves money, which you can spend it for doing R&D of another Azure services.

There are several ways to create create machines with basic service tier. You can use Azure portal or powershell. If you are using powershell New-AzureQuickVM cmdlet then just prefix "Basic_" to virtual machine instance size (e.g. to create A1 machine use "Basic_A1" for InstanceSize parameter).


Illustration: 

A1 Standard (1 core, 1.75 GB) Linux machine     
Per day Cost  = 24 hrs. * Rate
         = 24 * 0.06
                                 = 1.44 $
Monthly Cost = 1.44 * 30
                                 = 43.2 $

A1 Basic (1 core, 1.75 GB) Linux Machine
Per day Cost = 24 hrs. * Rate
        = 24 * 0.044
                                = 1.056 $
Monthly Cost = 1.056 * 30
                                 = 31.68 $


Changing instance type from standard to basic saves up to 25% of VM bill.

There are many ways to reduce the cloud cost like,
  • Identifying the unused VMs and shut them down. 
  • Add scheduler to start/stop non production VMs during office hours.
  • Choose instance type of VM carefully. 

Do give importance to such small things in cloud, because every PENNY counts right??
Share:

Thursday, May 21, 2015

Provision SQL server with powershell on azure

In this post I am explaining steps to provision SQL server on Azure cloud using powershell. Am also going to explain how to access newly provisioned SQL server using SQL Server Management Studio(SSMS). 

Provisioning SQL Server


Provisioning of SQL server mainly consists of below high level steps:
  • Configure connection between workstation and Azure account
  • Create SQL server VM in Azure
  • Add endpoint to SQL Server to listen on the TCP protocol
  • Add firewall rule to SQL server
  • Enable MIXED mode authentication and restart SQL Server instance
  • Create a SQL Server administrator login

Configure connection between workstation and Azure account


Firstly, we have to set a connection from workstation to Azure account by configuring the credentials and subscriptions. Refer https://msdn.microsoft.com/en-us/library/dn385850%28v=nav.70%29.aspx for creating and importing a publish settings file.  
Following code configures the workstation, along with newly created storage account.
# Parameters used for script
$serviceName="SQLServer"
$password="P@ssw0rd"
$StorageAccName = $serviceName -replace '-' | %{"${_}strg"}

# Add publish setting file
$PublishFile = "<Publish Setting File>"
Import-AzurePublishSettingsFile $PublishFile

# create storage account 
if (!(Test-AzureName -Storage $StorageAccName))
{  
    Write-Host "Creating Storage Account $StorageAccName"
    New-AzureStorageAccount -StorageAccountName $StorageAccName -Location "East US"
} 

# If you have multiple subscriptions in Azure account then select one of the as default  
Set-AzureSubscription -SubscriptionName "<subscription Name>" -CurrentStorageAccount $StorageAccName
Get-AzureSubscription

Create SQL server VM in Azure


After configuring the workstation, next step will be creating a SQL server using powershell scripts. Below code snippet gets the latest SQL server 2012 image and creates SQL server VM in Azure.  
    
    # Function to get latest image by name  
    function GetLatestImage
    {
       param($imageFamily)
       $images = Get-AzureVMImage | where { $_.ImageFamily -eq $imageFamily } | Sort-Object -Descending -Property PublishedDate
       return $images[0].ImageName
    }

    # parameters
    $Image = (GetLatestImage "SQL Server 2012 SP2 Enterprise on Windows Server 2012") 
    $UserName = "$serviceName-admin"
    $VMName = $serviceName

    # create Azure service   
    if (!(Test-AzureName -Service $serviceName))
    {   Write-Host "Creating $serviceName service"
        New-AzureService -ServiceName $serviceName -Label $VMName -Location "East US"
    }

    # create VM
    Write-Host "Creating SQL server machine $VMName"
    New-AzureVMConfig -Name $VMName -InstanceSize Large -ImageName $Image | 
    Add-AzureProvisioningConfig -Windows -Password $password -AdminUsername $UserName | 
    New-AzureVM –ServiceName $serviceName -WaitForBoot

Add endpoint to SQL Server to listen on the TCP protocol and start VM


Once machine got provisioned in Azure we have to add or update endpoints so that we can communicate with SQL server machine present on Azure cloud. Windows server by default have endpoints for remote desktop and powershell. We have to add endpoint which connects to default database port(1433). 
# Update vm to add endpoints
Get-AzureVM -Name $VMName -ServiceName $serviceName |
Add-AzureEndpoint -Protocol tcp -LocalPort 1433 -PublicPort 1433 -Name 'MSSQL'|
Update-AzureVM

Write-Host "Starting $VMName"
Start-AzureVM -ServiceName $serviceName -Name $VMName

Install certificates required for login in to SQL VM


For executing command on Azure windows machine which will configure our SQL server, we have to install certificates on the machine. Copy the contents from http://pshscripts.blogspot.in/2015/02/install-rmazurevmcert.html and paste it in "Install-WinRmAzureVMCert.ps1" file. Save this file in the same directory where our SQL provision script is present.
# Encrypt credentials 
$secpasswd = ConvertTo-SecureString $password -AsPlainText -Force
$AdminCredential = New-Object System.Management.Automation.PSCredential ($UserName, $secpasswd)

# Bypass security policies 
set-ExecutionPolicy -Scope CurrentUser Bypass -Force

# Install certificates
$ScriptPath = Split-Path $MyInvocation.InvocationName
Invoke-Expression "$ScriptPath\Install-WinRmAzureVMCert.ps1 -SubscriptionName '<Subscription Name>' -CloudServiceName $serviceName -VMName "$VMName"

# Get URI for SQL VM
$uri = Get-AzureWinRMUri –Service $serviceName –Name $VMName    

After installing certificates, we are going to invoke commands on newly created SQL instance. You can perform the following steps in single or multiple commands invocation.


Add Firewall rule


Invoke command on SQL server which adds the firewall rule to open default database port 1433.
Invoke-Command –ConnectionUri $uri –Credential $AdminCredential -ArgumentList $UserName, $password –ScriptBlock {
    param($UserName, $password) 
    
    Set-ExecutionPolicy Bypass
    
    # Add Firewall rule
    Write-Host "Adding firewall rule"
    netsh advfirewall firewall add rule name="SQL Server (TCP-In)" program='C:\Program Files\Microsoft SQL Server\MSSQL11.MSSQLSERVER\MSSQL\Binn\sqlservr.exe' dir=in protocol=TCP localport=1433 action=allow    
}

Configuring SQL server TCP port and Restart SQL server


Configure default SQL server instance to listen on port (1433) using TCP/IP protocol. After configuration restart the server.
Invoke-Command –ConnectionUri $uri –Credential $AdminCredential -ArgumentList $UserName, $password –ScriptBlock {
    param($UserName, $password) 
    
    Set-ExecutionPolicy Bypass
     
    Import-Module sqlps -DisableNameChecking

    # Configure the SQL Server TCP/IP protocol for the port that was configured in the endpoint
    Write-Host "Configuring SQL server TCP port"
    $TCPPort = "1433"
    [System.Reflection.Assembly]::LoadWithPartialName("Microsoft.SqlServer.SqlWmiManagement") | out-null
    $MachineObject = New-Object ('Microsoft.SqlServer.Management.Smo.WMI.ManagedComputer') .
    $tcp = $MachineObject.GetSMOObject("ManagedComputer[@Name='" + (Get-Item env:\computername).Value + "']/ServerInstance[@Name='MSSQLSERVER']/ServerProtocol[@Name='Tcp']")
    if ($tcp.IsEnabled -ne "True")
    {
        $tcp.IsEnabled = $true
        $tcp.alter()
        $MachineObject.GetSMOObject($tcp.urn.Value + "/IPAddress[@Name='IPAll']").IPAddressProperties[1].Value = $TCPPort
        $tcp.alter()
    }
    else
    {
        $MachineObject.GetSMOObject($tcp.urn.Value + "/IPAddress[@Name='IPAll']").IPAddressProperties[1].Value = $TCPPort
        $tcp.alter()
    }

    # Stop and start the SQL Server instance
    Write-Host "Restarting SQL server" 
    $Mssqlserver = $MachineObject.Services['MSSQLSERVER']
    $Mssqlserver.Stop()
    start-sleep -s 60
    $Mssqlserver.Start()
    start-sleep -s 60
} 


Enable MIXED mode authentication on SQL Server instance


We didn't setup any domain controller in Azure environment. So we are not able to connect SQL server from other machine using windows authentication mode. For connecting on premise installation we need SQL server configured in mixed mode(SQL server Authentication). 
    
    Invoke-Command –ConnectionUri $uri –Credential $AdminCredential -ArgumentList $UserName, $password –ScriptBlock {
        param($UserName, $password) 
    
        Set-ExecutionPolicy Bypass
     
        Import-Module sqlps -DisableNameChecking
        
        # Enabled MIXED mode authentication for the SQL Server instance
        Write-Host "Enabling mixed mode authentication"
        $LoginObject = New-Object ('Microsoft.SqlServer.Management.Smo.Server') $env:COMPUTERNAME
        $LoginObject.Settings.LoginMode = [Microsoft.SqlServer.Management.SMO.ServerLoginMode]::Mixed
        $LoginObject.Settings.Alter()

        # Stop and start the SQL Server instance 
        Write-Host "Restarting SQL server"
        $Mssqlserver.Stop()
        start-sleep -s 60
        $Mssqlserver.Start()
        start-sleep -s 60
    }

Create a SQL Server administrator login


At last, create a SQL authenticated user which is used to login into SQL instance from SQL Server Management Studio. 
      Username : "SQLServer-admin" 
      Password : "P@ssw0rd"
Note: SQL Server Azure VM and database username and password are same in this tutorial. Here, I have append "-admin" to $serviceName variable. You can change it to whatever you want.
Invoke-Command –ConnectionUri $uri –Credential $AdminCredential -ArgumentList $UserName, $password –ScriptBlock {
    param($UserName, $password) 
  
    Set-ExecutionPolicy Bypass
     
    Import-Module sqlps -DisableNameChecking

    $DatabaseUsername = $UserName
    $DatabasePassword = $password

    # Create SQL admin Login
    Write-Host "Creating SQL admin Login"
    Invoke-SqlCmd -ServerInstance $env:COMPUTERNAME -Database "master" -Query `
    "
        USE [master]
        GO
        IF Not EXISTS (SELECT name FROM master.sys.server_principals WHERE name = '$DatabaseUsername')
        BEGIN
         CREATE LOGIN [$DatabaseUsername] WITH PASSWORD='$DatabasePassword'
         EXEC sp_addsrvrolemember '$DatabaseUsername', 'sysadmin'
            EXEC sp_addsrvrolemember '$DatabaseUsername', 'dbcreator'
         EXEC sp_addsrvrolemember '$DatabaseUsername', 'securityadmin'
        END
        "
}   

SQL server machine is now setup in mentioned Azure subscription.


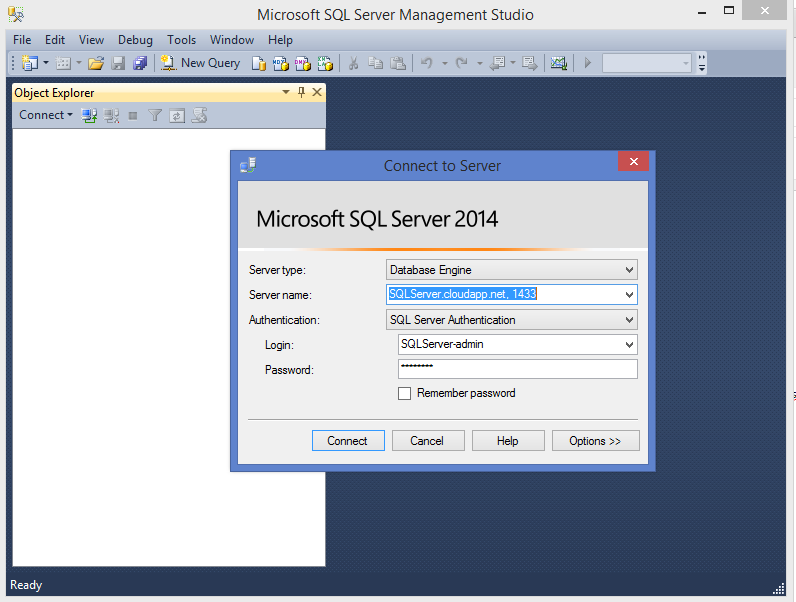
Connect to SQL server through SQL SERVER MANAGEMENT STUDIO


Open SQL Server Management Studio and login to SQL server using "SQL Server Authentication" mode.

Login Details:
         Server Name: "<Service Name>.cloudapp.net"
         Port              : 1433
         Login            : "<Service Name>-admin"
         Password      : "P@ssw0rd"


I hope, you successfully created SQL server on your Azure subscription. Suggestions and comments about this post are always welcome.

Share:

Wednesday, May 6, 2015

Execute Bash commands with Powershell on Azure VM


Recently, I had to provision and configure Linux machine through powershell on Azure cloud. We can create the linux machine very easily using powershell script. But i am more interested in configuring linux machine through powershell. For this i have to somehow SSH into linux machine to execute the bash scripts and commands.

There is module based on SSH.NET library for powershell which do SSH in to linux machine and then executes commands through powershell commands.

In this post, i am writing about installation and usage of SSH-Session module of powershell.

Installation


2. Firstly unblock the zip file (go to file properties), then unzip and place unzipped folder in one of PowerShell modules folders. You can find the module folders in powershell using following command,

PS C:\> $env:PSModulePath -split ';'
C:\Users\rahul\Documents\WindowsPowerShell\Modules
C:\Program Files (x86)\WindowsPowerShell\Modules
C:\Windows\system32\WindowsPowerShell\v1.0\Modules\
C:\Program Files (x86)\Microsoft SDKs\Azure\PowerShell\ServiceManagement

3. After unzipping the folders in powershell module folder import SSH-Sessions module.
 
PS C:\> Import-Module SSH-Sessions
VERBOSE: Loading module from path
'C:\Users\rahul\Documents\WindowsPowerShell\Modules\SS
VERBOSE: Loading 'Assembly' from path
'C:\Users\rahul\Documents\WindowsPowerShell\Modules\SS
VERBOSE: Loading module from path
'C:\Users\rahul\Documents\WindowsPowerShell\Modules\SS
VERBOSE: Exporting function 'ConvertFrom-SecureToPlain'.
VERBOSE: Exporting function 'New-SshSession'.
VERBOSE: Exporting function 'Invoke-SshCommand'.
VERBOSE: Exporting function 'Enter-SshSession'.
VERBOSE: Exporting function 'Remove-SshSession'.
VERBOSE: Exporting function 'Get-SshSession'.
VERBOSE: Importing function 'ConvertFrom-SecureToPlain'.
VERBOSE: Importing function 'Enter-SshSession'.
VERBOSE: Importing function 'Get-SshSession'.
VERBOSE: Importing function 'Invoke-SshCommand'.
VERBOSE: Importing function 'New-SshSession'.
VERBOSE: Importing function 'Remove-SshSession'.

3. Confirm the installation

PS C:\> Get-Command -Module SSH-Sessions
CommandType     Name                                               ModuleName
-----------               ----                                                    ----------
Function               ConvertFrom-SecureToPlain             SSH-Sessions
Function               Enter-SshSession                               SSH-Sessions
Function               Get-SshSession                                  SSH-Sessions
Function               Invoke-SshCommand                        SSH-Sessions
Function               New-SshSession                                SSH-Sessions
Function               Remove-SshSession                          SSH-Sessions

Usage

  • First we have to setup a ssh session with linux server using New-SshSession command
PS C:\> New-SshSession -ComputerName rk-ubuntu.cloudapp.net -Username rahul -Password "test123"
Successfully connected to rk-ubuntu.cloudapp.net

  • Get the SSH sessions using Get-SshSession command
PS C:\> Get-SshSession
ComputerName                                                                                        Connected
------------                                                                                                  ---------
rk-ubuntu.cloudapp.net                                                                             True
  • Execute the commands using Invoke-SshCommand command. Here i am executing commands to see kernel information and get hostname of linux machine.
PS C:\> Invoke-SshCommand -ComputerName rk-ubuntu.cloudapp.net -Command 'uname -a' -q
Linux rk-ubuntu 2 3.2.0-69-virtual #103-Ubuntu SMP Tue Sep 2 05:21:29 UTC 2014 x86_64 x86_64 x86_64 GNU/Linux 
PS C:\> Invoke-SshCommand -ComputerName rk-ubuntu.cloudapp.net -Command 'hostname' -q
rk-ubuntu

  • Interactive SSH session using Enter-SshSession command
  PS C:> Enter-SshSession -ComputerName rk-ubuntu.cloudapp.net
[rk-ubuntu] rahul # : cat /etc/*-release
DISTRIB_ID=Ubuntu
DISTRIB_RELEASE=14.04
DISTRIB_CODENAME=trusty
DISTRIB_DESCRIPTION="Ubuntu 14.04.2 LTS"
NAME="Ubuntu"
VERSION="14.04.2 LTS, Trusty Tahr"
ID=ubuntu
ID_LIKE=debian
PRETTY_NAME="Ubuntu 14.04.2 LTS"
VERSION_ID="14.04"
HOME_URL="http://www.ubuntu.com/"
SUPPORT_URL="http://help.ubuntu.com/"
BUG_REPORT_URL="http://bugs.launchpad.net/ubuntu/"
[rk-ubuntu] rahul # : exit

  • Remove SSH session using Remove-SshSession command 
PS C:\> Remove-SshSession -ComputerName rk-ubuntu.cloudapp.net 
PS C:\> Get-SshSession
No connections found

Hope this article is helpful for you guys. 
Comments and suggestions are welcome.


Share: