In this post I am explaining steps to provision SQL server on Azure cloud using powershell. Am also going to explain how to access newly provisioned SQL server using SQL Server Management Studio(SSMS).
Provisioning SQL Server
Provisioning of SQL server mainly consists of below high level steps:
- Configure connection between workstation and Azure account
- Create SQL server VM in Azure
- Add endpoint to SQL Server to listen on the TCP protocol
- Add firewall rule to SQL server
- Enable MIXED mode authentication and restart SQL Server instance
- Create a SQL Server administrator login
Configure connection between workstation and Azure account
Following code configures the workstation, along with newly created storage account.
# Parameters used for script
$serviceName="SQLServer"
$password="P@ssw0rd"
$StorageAccName = $serviceName -replace '-' | %{"${_}strg"}

# Add publish setting file
$PublishFile = "<Publish Setting File>"
Import-AzurePublishSettingsFile $PublishFile

# create storage account
if (!(Test-AzureName -Storage $StorageAccName))
{
    Write-Host "Creating Storage Account $StorageAccName"
    New-AzureStorageAccount -StorageAccountName $StorageAccName -Location "East US"
}

# If you have multiple subscriptions in Azure account then select one of the as default
Set-AzureSubscription -SubscriptionName "<subscription Name>" -CurrentStorageAccount $StorageAccName
Get-AzureSubscription
Create SQL server VM in Azure
After configuring the workstation, next step will be creating a SQL server using powershell scripts. Below code snippet gets the latest SQL server 2012 image and creates SQL server VM in Azure.
    # Function to get latest image by name
    function GetLatestImage
    {
       param($imageFamily)
       $images = Get-AzureVMImage | where { $_.ImageFamily -eq $imageFamily } | Sort-Object -Descending -Property PublishedDate
       return $images[0].ImageName
    }

    # parameters
    $Image = (GetLatestImage "SQL Server 2012 SP2 Enterprise on Windows Server 2012")
    $UserName = "$serviceName-admin"
    $VMName = $serviceName

    # create Azure service
    if (!(Test-AzureName -Service $serviceName))
    {   Write-Host "Creating $serviceName service"
        New-AzureService -ServiceName $serviceName -Label $VMName -Location "East US"
    }

    # create VM
    Write-Host "Creating SQL server machine $VMName"
    New-AzureVMConfig -Name $VMName -InstanceSize Large -ImageName $Image |
    Add-AzureProvisioningConfig -Windows -Password $password -AdminUsername $UserName |
    New-AzureVM –ServiceName $serviceName -WaitForBoot
Add endpoint to SQL Server to listen on the TCP protocol and start VM
Once machine got provisioned in Azure we have to add or update endpoints so that we can communicate with SQL server machine present on Azure cloud. Windows server by default have endpoints for remote desktop and powershell. We have to add endpoint which connects to default database port(1433).
# Update vm to add endpoints
Get-AzureVM -Name $VMName -ServiceName $serviceName |
Add-AzureEndpoint -Protocol tcp -LocalPort 1433 -PublicPort 1433 -Name 'MSSQL'|
Update-AzureVM

Write-Host "Starting $VMName"
Start-AzureVM -ServiceName $serviceName -Name $VMName
Install certificates required for login in to SQL VM
For executing command on Azure windows machine which will configure our SQL server, we have to install certificates on the machine. Copy the contents from http://pshscripts.blogspot.in/2015/02/install-rmazurevmcert.html and paste it in "Install-WinRmAzureVMCert.ps1" file. Save this file in the same directory where our SQL provision script is present.
# Encrypt credentials
$secpasswd = ConvertTo-SecureString $password -AsPlainText -Force
$AdminCredential = New-Object System.Management.Automation.PSCredential ($UserName, $secpasswd)

# Bypass security policies
set-ExecutionPolicy -Scope CurrentUser Bypass -Force

# Install certificates
$ScriptPath = Split-Path $MyInvocation.InvocationName
Invoke-Expression "$ScriptPath\Install-WinRmAzureVMCert.ps1 -SubscriptionName '<Subscription Name>' -CloudServiceName $serviceName -VMName "$VMName"

# Get URI for SQL VM
$uri = Get-AzureWinRMUri –Service $serviceName –Name $VMName
After installing certificates, we are going to invoke commands on newly created SQL instance. You can perform the following steps in single or multiple commands invocation.
Add Firewall rule
Invoke command on SQL server which adds the firewall rule to open default database port 1433.
Invoke-Command –ConnectionUri $uri –Credential $AdminCredential -ArgumentList $UserName, $password –ScriptBlock {
    param($UserName, $password)

    Set-ExecutionPolicy Bypass

    # Add Firewall rule
    Write-Host "Adding firewall rule"
    netsh advfirewall firewall add rule name="SQL Server (TCP-In)" program='C:\Program Files\Microsoft SQL Server\MSSQL11.MSSQLSERVER\MSSQL\Binn\sqlservr.exe' dir=in protocol=TCP localport=1433 action=allow
}
Configuring SQL server TCP port and Restart SQL server
Configure default SQL server instance to listen on port (1433) using TCP/IP protocol. After configuration restart the server.
Invoke-Command –ConnectionUri $uri –Credential $AdminCredential -ArgumentList $UserName, $password –ScriptBlock {
    param($UserName, $password)

    Set-ExecutionPolicy Bypass

    Import-Module sqlps -DisableNameChecking

    # Configure the SQL Server TCP/IP protocol for the port that was configured in the endpoint
    Write-Host "Configuring SQL server TCP port"
    $TCPPort = "1433"
    [System.Reflection.Assembly]::LoadWithPartialName("Microsoft.SqlServer.SqlWmiManagement") | out-null
    $MachineObject = New-Object ('Microsoft.SqlServer.Management.Smo.WMI.ManagedComputer') .
    $tcp = $MachineObject.GetSMOObject("ManagedComputer[@Name='" + (Get-Item env:\computername).Value + "']/ServerInstance[@Name='MSSQLSERVER']/ServerProtocol[@Name='Tcp']")
    if ($tcp.IsEnabled -ne "True")
    {
        $tcp.IsEnabled = $true
        $tcp.alter()
        $MachineObject.GetSMOObject($tcp.urn.Value + "/IPAddress[@Name='IPAll']").IPAddressProperties[1].Value = $TCPPort
        $tcp.alter()
    }
    else
    {
        $MachineObject.GetSMOObject($tcp.urn.Value + "/IPAddress[@Name='IPAll']").IPAddressProperties[1].Value = $TCPPort
        $tcp.alter()
    }

    # Stop and start the SQL Server instance
    Write-Host "Restarting SQL server"
    $Mssqlserver = $MachineObject.Services['MSSQLSERVER']
    $Mssqlserver.Stop()
    start-sleep -s 60
    $Mssqlserver.Start()
    start-sleep -s 60
}
Enable MIXED mode authentication on SQL Server instance
We didn't setup any domain controller in Azure environment. So we are not able to connect SQL server from other machine using windows authentication mode. For connecting on premise installation we need SQL server configured in mixed mode(SQL server Authentication).
    Invoke-Command –ConnectionUri $uri –Credential $AdminCredential -ArgumentList $UserName, $password –ScriptBlock {
        param($UserName, $password)

        Set-ExecutionPolicy Bypass

        Import-Module sqlps -DisableNameChecking

        # Enabled MIXED mode authentication for the SQL Server instance
        Write-Host "Enabling mixed mode authentication"
        $LoginObject = New-Object ('Microsoft.SqlServer.Management.Smo.Server') $env:COMPUTERNAME
        $LoginObject.Settings.LoginMode = [Microsoft.SqlServer.Management.SMO.ServerLoginMode]::Mixed
        $LoginObject.Settings.Alter()

        # Stop and start the SQL Server instance
        Write-Host "Restarting SQL server"
        $Mssqlserver.Stop()
        start-sleep -s 60
        $Mssqlserver.Start()
        start-sleep -s 60
    }
Create a SQL Server administrator login
At last, create a SQL authenticated user which is used to login into SQL instance from SQL Server Management Studio.
Username : "SQLServer-admin"
Password : "P@ssw0rd"
Note: SQL Server Azure VM and database username and password are same in this tutorial. Here, I have append "-admin" to $serviceName variable. You can change it to whatever you want.
Username : "SQLServer-admin"
Password : "P@ssw0rd"
Note: SQL Server Azure VM and database username and password are same in this tutorial. Here, I have append "-admin" to $serviceName variable. You can change it to whatever you want.
Invoke-Command –ConnectionUri $uri –Credential $AdminCredential -ArgumentList $UserName, $password –ScriptBlock {
    param($UserName, $password)

    Set-ExecutionPolicy Bypass

    Import-Module sqlps -DisableNameChecking

    $DatabaseUsername = $UserName
    $DatabasePassword = $password

    # Create SQL admin Login
    Write-Host "Creating SQL admin Login"
    Invoke-SqlCmd -ServerInstance $env:COMPUTERNAME -Database "master" -Query `
    "
        USE [master]
        GO
        IF Not EXISTS (SELECT name FROM master.sys.server_principals WHERE name = '$DatabaseUsername')
        BEGIN
         CREATE LOGIN [$DatabaseUsername] WITH PASSWORD='$DatabasePassword'
         EXEC sp_addsrvrolemember '$DatabaseUsername', 'sysadmin'
            EXEC sp_addsrvrolemember '$DatabaseUsername', 'dbcreator'
         EXEC sp_addsrvrolemember '$DatabaseUsername', 'securityadmin'
        END
        "
}
SQL server machine is now setup in mentioned Azure subscription.
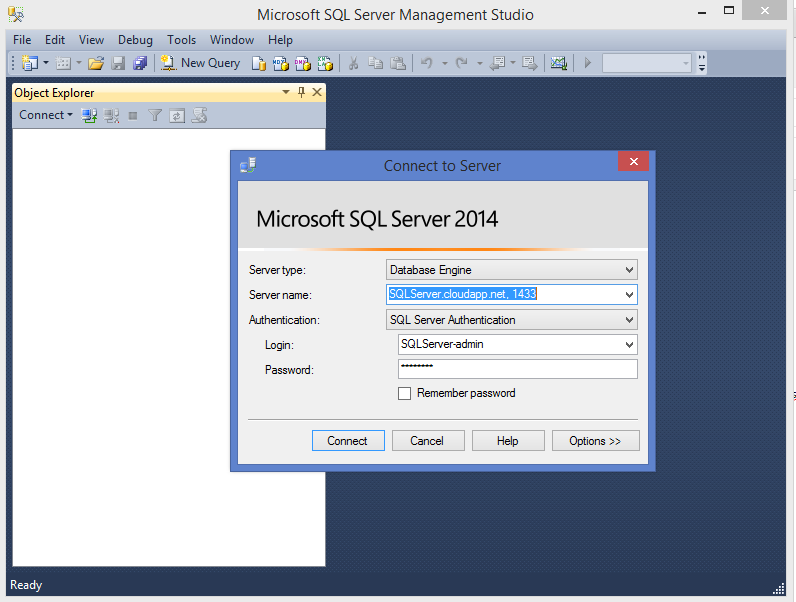
Connect to SQL server through SQL SERVER MANAGEMENT STUDIO
Open SQL Server Management Studio and login to SQL server using "SQL Server Authentication" mode.
Login Details:
Server Name: "<Service Name>.cloudapp.net"
Port : 1433
Login : "<Service Name>-admin"
Password : "P@ssw0rd"
I hope, you successfully created SQL server on your Azure subscription. Suggestions and comments about this post are always welcome.


0 comments:
Post a Comment